The Jam Jar One Year On
We bought our Rav4, fondly known as the JamJar, on December 5 last year. We took it winter camping that very same day, just flipping down the back seats and throwing our sleeping bag in there. We've had almost 20 outings together since then and it just keeps getting better and better each time as we refine the process. We are extremely pleased with the whole thing.
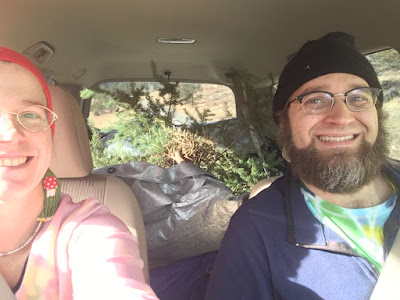 |
| We wanted a 6 foot Christmas tree, in part, because we knew it would fit inside the JamJar on the drive home from the mountains. It smelled so good in there! 12/4/2021 |
We did a good bit of winter camping just outside Yellowstone, including the day after Christmas 2020 when we had the whole campground to ourselves. We met up with two friends and we camped in the back of our respective SUVs in March. We arranged stays with Hannah and Jesscy at their respective off-grid, tiny-houses in the country. The JamJar wildly exceeded our expectations on its inaugural Megavacation. At that point we already knew it was awesome for a night or two. A full week or more was another kind of test, but the JamJar passed with flying colors.
 |
| A light dusting fell overnight. That's my towel from our hot spring soak on the boulder there. It was frozen stiff in the morning. Inside the JamJar we were toasty warm! 12/27/2021 |
I have been very impressed with Matt's DIY modifications as we make the JamJar a swell little micro-RV for two. It's basically all him. He's the one who did all the research, and drafted all the plans. I'm just around to help execute things as needed.
 |
| Matt installing one of the hinges. 1/31/2021 |
The sleeping platform is the pièce de résistance, so to speak. Matt constructed a wonderful platform custom designed for the space. It is hinged on both ends. The tail hinge allows us easy access to the storage space underneath which is where we keep our cooler, water jug, and other gear and supplies. This space was one of the reasons Matt wanted a Rav4 from 2012 or before. Those years have this great storage compartment AND a full-sized spare mounted on the rear door. In later model of the Rav4 the spare is inside, taking up all that beautiful storage space.
 |
| Matt, ever the card, demonstrates just how spacious that under-platform storage space really is. 3/6/2021 |
We attached a cord with a S-hook on the end to the carseat anchor in the ceiling. Matt put an eyelet screw on the underside of the tail portion of the platform. Slip the s-hook into that eyelet and we can have the back propped open for easy access to the storage area while we cook or set up camp.
 |
| The tail flap in the "up" position. 3/6/2021 |
The nose end of the platform is also hinged so that, when we set up for the night, the front seats can be moved to their forwardmost position. This allows the nose hinge to come down making the platform long enough to comfortably accommodate Matt's 6-foot frame. There are removable legs that support the hinged panel once we flip it open. They're held in place with a long pin that goes through a hole in the platform into a hole in the center of each leg.
 |
| Matt makes a mighty fine JamJar model, if I do say so myself. Here you can see the detachable 2x4 legs for the nose flap portion of the platform. 3/6/2021 |
The platform is made out of 2x4s, and 3/4 inch plywood. He covered the top surface of the platform with carpet squares for comfort (and splinter prevention).

 |
| The tail flap in the "up" position, as seen from inside. 3/6/2021 |
The platform sits over top of the back seats (in their folded down position, obviously) and both parts of the platform can be stacked in the cargo area of the vehicle, if needed. The two components of the platform are held together by two simple metal pins. Pull the pins, stack the two parts of the platform, and bingo-bango, we we can still use the back seat for humans. That doesn't come up a lot for us, but it is very nice to have the option. Like when we drove Matt's parents to Christmas Eve church, say.
 |
| Window shields. |
We crafted light-blocking insulative window shields. They're comprised of corrugated thermal house insulation with black fabric attached to one side and white fabric attached to the other side. We used spray Elmer's glue to attach the fabric.
 |
| Here the shiny silver thermal insulation is still visible as we hadn’t yet glued the black fabric on. |
These are only the version 1.0 and will get tweaked a little at some point for the 2.0 version in due time. Still, they're pretty gosh darn amazing. When we pull them down in the morning it is blinding out there, compared to the blackout inside. The white fabric on the inside makes it still feel spacious inside the JamJar.

The window shields certainly add privacy, too, though we don't camp many places where that's been an issue. Before next summer we're going to make some window screens that attach with magnets to the body of the JamJar. We didn't have a huge problem with bugs when we slept with the windows down, but we've had enough bad mosquito camp outs over the years to know we should get some screens.
 |
| Most of the window shields are off—hence all the sunshine—but this picture shows how the window shields just nestle into the window frames. |
We have a plastic tote that we fill with a lot of our gear--though nothing electronic or expensive. It rides around on the sleeping platform during the day and has been just set outside the vehicle by one of the tires at night. Hence the nothing electronic or expensive guideline. Other gear, like my guitar or our bag of clothes, we just put in the front seat when we're set up for the night. This has worked out just keen for the past year. We'll be buying a roof rack for a more secure and permanent solution though.
 |
| Cruising through Colorado on Matt's birthday trip. 9/17/2021 |
We've found a number of pros to JamJar camping already:
- We can go camping when it is way colder and still sleep like cozy, little babies. We've never been the sort of people who think camping season ends at Labor Day, but the insulation and wind protection, being up off the frozen ground, these all mean that we never have to stop camping now. We could go any month of the year.
- On a related note, the JamJar also offers a lot more protection than our tent when conditions are rainy and/or windy. We're unreasonably blessed with good weather on our adventures, for which I am grateful, but sitting in a tent in gusting rainstorm is less enjoyable than sitting in the JamJar.
- We have more of a sound buffer, if needed. The enclosed hardbody space of the JamJar is sure different than a nylon tent. This can be helpful when camping in large groups, at music festivals, or rowdy weekend campgrounds. Places where other campers might be noisy later and/or earlier than I would prefer. The JamJar helps drown that all out. On the other hand, if we roll all the windows down while we sleep we can still hear the owls hooting at night and the larks singing in the morning. Again, it is nice to have options.
- We can go camping places that have more rugged and/or snowy roads than we could in our Corolla because of the higher clearance and 4WD. We're still somewhat cautious about road conditions, but it opened up a whole new range of camping options.
 |
| Sunset on the mountains on the last leg of our Redwoods Megavacation. 8/22/2021 |
I am so eager to see where the JamJar will take us in 2022.

WOW Beth!...that is the most amazing 'camper' I've ever seen...kudos to y'all...
ReplyDelete~Have a lovely day!
Oh, many thanks, Teresa!
DeleteUtterly brilliant! Will you be adding some colourful cushions or bunting Beth? Happy Camping to you both xx
ReplyDeleteThanks, San! I have talked about making some really cool inside panels for the window shields instead of just the plain white. Maybe embroidery or tie-dye or something. Now that you mention it though, I think a bunting made from almost absurdly tiny little triangles would be cute as all get out around the ceiling in there....
DeleteThis is SO cool! Love the nifty set-up and how you thought through all the situations for what your needs are. I have already drooled over those camper-vans for retirement when it's just my husband and me wanting to tool around - yours is such a clever DIY option that still functions as a regular vehicle too! Love it.
ReplyDeleteIt is a very handy little starter model. :) So useful and multi-purpose, which always appeals to me. Someday I suspect Matt and I will upgrade to a proper van, but it really it swell for our life right now, as you said.
DeleteOn a related note: When I first started blogging I made blogfriends with a swell gal from New Zealand (who's husband happens to share the same first name as my dad). They lived on a farm and for many, many years I was enthralled by all their homesteadery posts in such a lush and green setting. Then, they sold the farm and moved to the city and she stopped blogging. Sigh. All things come to an end. However, to my extreme delight, I discovered in December that she's started blogging again because they've done a DIY campervan modification and are now traveling all over in it. I was so tickled to be able to see her (new chapter of) adventures and live vicariously with her until Matt and I are ready to take the plunge.
Wow, this is very impressive.
ReplyDelete:) Thanks, Lisa. I am so pleased with it thus far. Matt did a lot of background reading to make this come to be. Bless him!
Delete