We never have had room for growing tomatoes in 3D, in the round, in cages. We always grew them up a flat trellis or tied back with hemp string, along the side of our house because that was what space permitted. But, now we DO have room for freestanding tomatoes and so Matt finally got to put into action a tomato cage plan that he'd been hatching for over a year.
See, Matt is a researcher. If he has the desire for something he will learn all about it, especially if with a bit of learning he could go ahead and make it himself. So, after reading the merits of various styles of tomato cages and construction materials, watching innumerable demonstrational videos, and pricing various store-bought tomato cages he, rather predictably, settled on a DIY job. It was very easy, surprisingly easy in fact, as a two-person operation, but you could do it alone, too, with minimal difficulty I am sure.
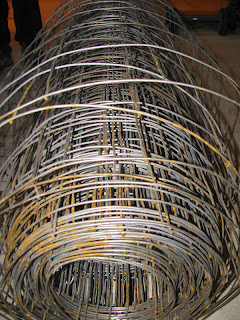
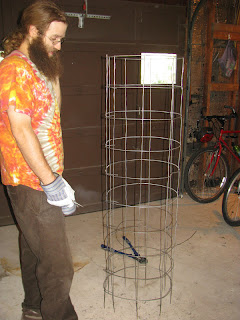
You will need: bolt cutters, pliers, and "concrete reinforcing mesh" (available at hardware and home improvement stores). This mesh comes in a (large and heavy) roll and has a grid of 6-inch squares, large enough to easily fit a grown man's hand inside for the ease of tending and harvesting the tomatoes. A pair of gloves is also recommended, but not required I suppose.
 |
| The metal may rust, but if painted will not. |
Since the mesh is intended to reinforce concrete you can imagine that it is heavy-duty stuff...well up to the task of supporting tomatoes! (I don't know about you, but I find the standard tomato cage to be frightfully flimsy things.) That is not the case here. These are some real hum-dingers....not going to collapse or bend out of shape very darn easily!
Each square, as I mentioned, is 6 inches across. We are making our
cages in three sizes so that they nest inside each other for easy
out-of-season storage. We are making 4 ft, 4 1/2 ft, and 5 ft cages
When cutting the length of mesh for each cage it's important to actually
add an extra square to your desired length. Thus to make a 4ft cage you
cut 4 1/2 feet of the
mesh (which translates to ten squares). For a 5 ft cage you cut 5 1/2
feet of mesh (12 squares) and so on. The reason for the extra square
is that ultimately the flat piece of mesh is
made into a tube and you need that extra six inches to make the hook
closure that holds the cage in its tube shape. The extra six inches is folded in half to make a sort of hook that clasps over the square on the opposite end of the section of mesh. Just wait and see...it will make sense. (I hope!)
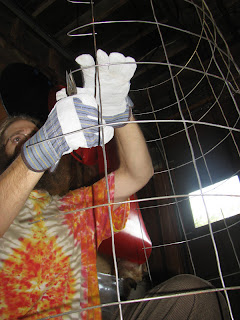 |
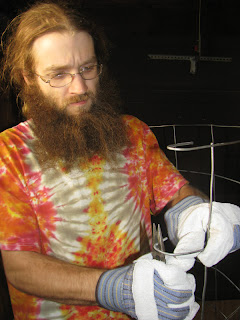
| Matt, bending the hook clasps. |
 |
| A close up shot of one of the hooks being bent. |
The video above shows Matt bending the extra six inches into the hook closure. The video below shows Matt slipping the hooks into the squares on the opposite end of the mesh section to create the tube-shaped, 3-D cage. The videos are a bit dark since we were working in the garage, but I think you'll get my point.
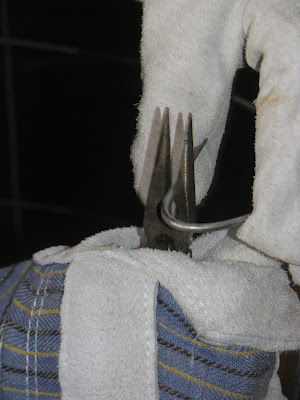
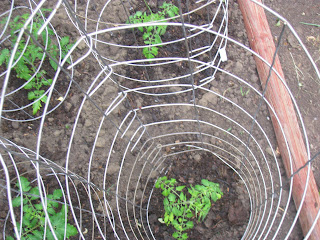
But before making the cage into its final round, tube form there is one
more step. You want to cut the bottom strand off the length of the mesh
so that you have little legs to sink into the ground.
 |
| Snipping off the bottom so that there are, essentially, stakes to be sunk into the ground. |
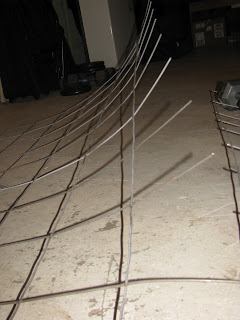 |
| This is what the "stakes" or little legs look like. It is also what the extra six inches used for the hook closures look like before being bent into hooks. |
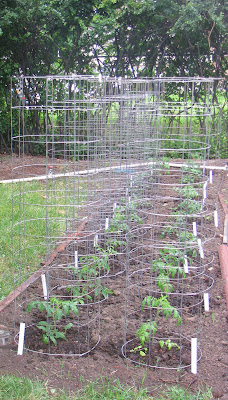
While these little legs do allow the cages to stand by themselves (ours have been unstaked for several weeks) I do think it would probably be wise to fix the cage to a sturdy stake or T-post...just in case. We've been meaning to do so since we set them up really, but, well it just hasn't happened yet. Maybe we'll say it was an experiment to see if we really need t-posts and hope the answer is that they don't. Or maybe we'll actually get around to it this weekend.
 |
| Note the little feet on the bottom. |
The tomatoes are filling out nicely in their cages now. Looking at them
this morning (why didn't I take a photo to show you all?!) I told Matt
I just couldn't believe how much fuller and happier they look growing
all round and bushy rather than be constantly retrained. I hope they
produce like gangbusters!
The whole project cost $100 dollars and we now have 30+ tomato cages. That works out to be about $3.33 per cage which is a steal for such a sturdy cage from what I've seen priced at the local greenhouses and hardware stores. We only have 22 tomato plants so the extras are going to be tested in other capacities, possibly pepper and beans.
 See, Matt is a researcher. If he has the desire for something he will learn all about it, especially if with a bit of learning he could go ahead and make it himself. So, after reading the merits of various styles of tomato cages and construction materials, watching innumerable demonstrational videos, and pricing various store-bought tomato cages he, rather predictably, settled on a DIY job. It was very easy, surprisingly easy in fact, as a two-person operation, but you could do it alone, too, with minimal difficulty I am sure.
 The whole project cost $100 dollars and we now have 30+ tomato cages. That works out to be about $3.33 per cage which is a steal for such a sturdy cage from what I've seen priced at the local greenhouses and hardware stores. We only have 22 tomato plants so the extras are going to be tested in other capacities, possibly pepper and beans.


We used tomato cages for many years. We always loathed disentangling the cages from the dead/dying vines in the fall so one year decided not to use them. Our tomato plants grew very well without support, our yield was still very good, and no more disentangling in the fall, we have not used cages in several years and this spring we gave all of them away. We grow a lot of tomatoes each year, around 50 plants, so we had a lot of cages to give away.
ReplyDeleteHow do you support them?
DeleteHello Again,
ReplyDeleteI fear my comment may have come across as less than charitable, and I certainly did not mean to rain on your parade :), I apologize if any offense was taken. Your husband did a splendid job making the cages and they look very nice.
Blessings to you,
Bean
No worries at all, Bean!
DeleteSo, do the plants vine and sprawl outward more like say, squash, or do they bush up on themselves? Do they take up more space than when caged? I am very curious. I've never known anyone who didn't grow tomatoes caged or trellised in some fashion.
I bet the recipients of your old cages were appreciative! They don't come cheap, usually.
For the most part the plant grows and stands up, once the fruit is well established the vines simply drop lower and lower with the weight until on the ground. We space our plants 24 inches apart. We live in Indiana, in the central part of the state they grow fields and fields of tomatoes, and obviously it is not practical to use cages on this scale, yet the tomatoes grow well, in fact the fields are rather pretty to drive by in mid August as they are primarily green with the vines lying around everywhere but everywhere you look are red orbs of tomatoey goodness!
DeleteWe found plenty of willing takers for the cages :)
Bean
You know (and this is probably stupid of me) but I have never paused to consider what commercial, large-scale tomato cultivation would be like. Yes, cages wouldn't seem super practical. I can't really imagine a full field of them....I bet it is really something! Thanks for all your thoughts!
DeleteThose are some handy, dandy tomato cages. I have one like that. A guy gave it to me, one his father made 30 years ago and not as tall, fatter. But, it was homemade on the same principle.
ReplyDeleteYou are going to be using these cheap cages to good use and eating like a king and queen!
One suggestion--since tomatoes are heavy plants and the cages are so tall, you might want to anchor them with coat hanger "bobbie pin" like anchors. A strong wind will take down a fence with tomatoes on it.
Your backyard is going to be one fine "farmette" with Matt able to make the structures you need and both of you working on the garden chores. I like watching the progress.
Good idea on the anchors. We really do need to get our rears in gear and get them secured somehow.
DeleteA "farmette" is totally what we're going for...slow and steady. Thanks for your encouragement! Its a great labor of love.
My brother made some of these nearly 30 years ago and is still using them. Good luck with the tomatoes!
ReplyDeleteThanks! And that is just the sort of review I like hearing!
DeleteSince those are so tall, a tall stake might be all you need to hold them secure against wind. The pins might not be enough to hold them in place but would be another layer of security.
ReplyDeleteI would stop by roadside dumps, trash on the curb, just anything nasty and pick up mops and brooms to take home. When the nasty mop head or broom head is sawed off, the sticks make fine stakes. Paint them to help them last longer. The metal handles don't work well, just wooden ones.
The
that is brilliant! I'm going to show this to my husband. He plants our tomatoes too close together and this tomato cage would also help with spacing.
ReplyDeleteYou know, it really did help with spacing. They look so much happier (not a mass of tangled vines) than last year already!
Deletethis is what we did too!!!!!! it works perfectly. great minds...
ReplyDelete: )
DeleteAnd aren't they just awesome?!
I hope you're having a great day!
We also made these 30 years ago and still have them. Some of ours are from 7 foot high reinforcing wire,.. and as you know the indeterminate tomatoes go up and over these at times!! :) My husband actually made the reinforcing mesh that is used in your cages for the company he retired from. Over the years you may have to redo the bottom pieces that poke into the ground as they rust off. We also made some shorter and smaller ones for the taller pepper plants. Sarah
ReplyDeleteI'm glad to hear they hold up so well...even if the tomatoes do try to out grow them!!!
Delete